Interacting with Hashnode's API with Next.JS and Apollo Client

I'm a full-stack developer from the Chicago suburbs. I primarily build applications using React, Typescript, and C#. I'm a big fan of Next.js and taking advantage of serverless technologies.
Outside of development, I spend a lot of time reading and playing video games. I also happen to be a Sith Lord, so I spend a decent amount of time shooting lightning from my hands and spinning. It's a good trick.
I finally got around to finishing up my website, brockherion.dev. One of the neat things I ended up doing was getting it hooked up with Hashnode's GraphQL API. I wanted to be able to take advantage of Hashnode's community engagement as well as be able to showcase articles on my site. Apollo Client and Next.JS made it incredibly easy to get going with their API.
In this article, I will walk you through how to set up your Next.JS projects to pull articles from Hashnodes API. I will also share with you the current limitations of it.
Motivation
I've tried many platforms for blogging in my short year in this space. I never found that suited my needs quite right. I started with Medium, then tried Dev.to for a little bit, then had an existential crisis of choosing between Ghost and WordPress.
Deciding I didn't like either of those, I then decided I was going to just build the whole thing from scratch. I wanted complete control over how my website looked and felt and to be able to host it rather cheaply. I eventually settled on using Next.JS and hosting the site on Vercel.
What I still struggled with was how to manage and maintain the blog portion myself. I'm not too familiar with optimizing SEO and didn't want the hassle of managing file storage or redeploying my whole site every time I posted. In my search for a solution that would give me the best of both worlds, I stumbled across Hashnode.
Hashnode provided a level of engagement that platforms like Medium and Dev.to do while allowing me to customize my own page and make it unique to me. I set up my colors to match the theme of my site, created a subdomain, and started publishing content. What sealed the deal for me was their GraphQL API. While still in beta (I believe), their API would let me pull content to display and showcase on my main site.
Integrate your Next.JS app with Hashnode
I'm going to assume that you have your Next app setup already. If you don't have already, you can head on over to the Next.JS docs Getting Started page to create a new app.
Get your API key from Hashnode
The first thing you will want to do is navigate over to your Hashnode account. Click on your profile on the bottom left and go to Account Settings. You are then going to click the Developer section on that page.
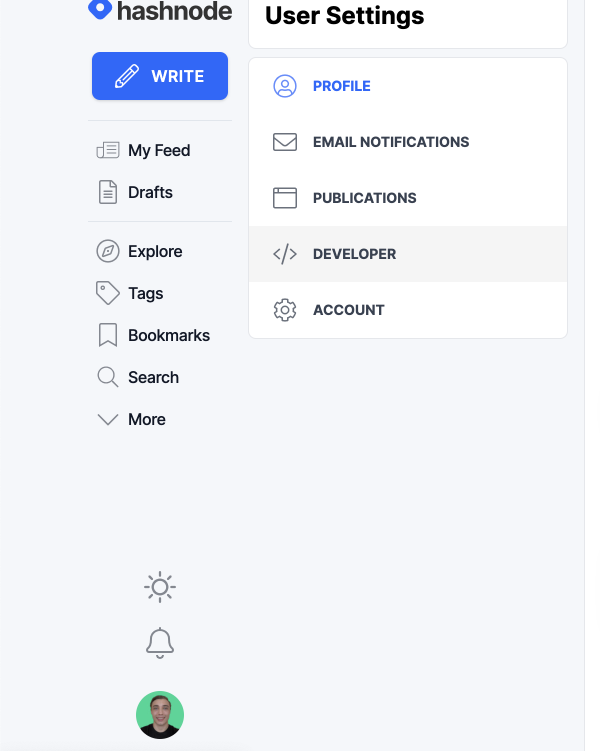
Once on the developer page, you're going to want to create a Personal Access Token for yourself. You need to have this token in order to interact with the API.
Copy your token and add it to your .env file in your Next project. I also added the base API URL to my .env as well, just to make life a little bit simpler.
HASHNODE_API_URL="https://api.hashnode.com/"
HASHNODE_API_KEY="<your-key-here>"
Add and configure Apollo Client in your Next project
Let's go ahead and get Apollo set up. Open a command line and run in your Next project root:
$ yarn add @apollo/client graphql
# or
$ npm i @apollo/client graphql
Now, we need to configure our client. Create a file called apollo-client.js. Go ahead add the following code to it.
// src/utils/apollo-client.js
import { ApolloClient, InMemoryCache, createHttpLink } from '@apollo/client';
import { setContext } from '@apollo/client/link/context';

const httpLink = createHttpLink({
  uri: process.env.HASHNODE_API_URL
});

const authLink = setContext((_, { headers }) => {
  const token = process.env.HASHNODE_API_KEY
  return {
    headers: {
      ...headers,
      authorization: token ? `Bearer ${token}` : "",
    }
  }
})

const client = new ApolloClient({
  link: authLink.concat(httpLink),
  cache: new InMemoryCache()
})

export default client;
In this block of code, we are configuring our API route and adding our Personal Access Token to our header. For every request we send to the Hashnode API, we need to include that access token. We are also setting up an in-memory cache that we can use to store our responses from the API, so we don't need to make repeat trips every time the page loads.
Configure Next.JS
There's one step that is needed to make that our GraphQL client fetch data from Hashnode. If you were to run the site and try to fetch an image, you will most likely run into an error that the Hashnode CDN is not an authorized domain.
To fix this, we need to go into our Next.config.js file and add the following configuration to it
module.exports = {
  ...
  images: {
    domains: ['cdn.hashnode.com',]
  }
  ...
}
Fetching and Displaying Data
And now, the moment of truth. Let's go into our index.jsx file and fetch a post from Hashnode. We also are going to want to fetch some reactions to the post and how many of each reaction it got. First, let's define our query
// src/pages/index.jsx
import { gql } from "@apollo/client";

...

const POST_QUERY = gql`
  query {
    post(
      slug: "slug-of-the-post-you-want"
      hostname: ""
    ) {
      cuid
      slug
      title
      brief
      reactions {
        reaction {
          name
          image
        }
        count
      }
    }
  }
`;
This is enough information to make a nice-looking card. Next, we need to actually send our request to Hashnode. Let's do that in our getServerSideProps function.
// src/pages/index.jsx
import client from "../utils/apollo-client";

...

export async function getServerSideProps() {
  const { data } = await client.query({
    query: POST_QUERY,
  });

  return {
    props: {
      post: data.post,
    },
  };
}
Finally, let's display our data on our page
// src/pages/index.jsx
import Image from "next/image";

export default function Home({ post }) {
   return (
    ...
    <div id={post.cuid}>
      <h3>{post.title}</h3>
      <p>{post.brief}</p>
      {post.reactions.map((reaction) => (
        <div key={reaction.reaction.name}>
          <Image src={reaction.reaction.image} width={30} height={30} />
          <span>{reaction.count}</span>
        </div>
      ))}
    <div>
    ...
  );
}
You should now be seeing your post data on your website!
For a complete example, you can check out my GitHub repository for brockherion.dev, where I do something very similar to here but also use TypeScript and Tailwind.
Current Drawbacks
Like I mentioned earlier, I believe their API is still in beta. What I wanted to do was fetch a few articles and show them off as featured, then link back to the Hashnode. I also wanted to fetch my series and to show those as a popular categories section. Unfortunately, that functionality is not supported at the moment.
When I ended up doing was hardcoding my series URL into that section and then fetching one post to display on the site. It looks good still, but it's not what I had initially intended.
If you are planning on using Hashnode in a similar manner to me, then this is something minor. It's easy to workaround, and for the most part, it's more of an annoyance than anything else. If you are planning on using Hashnode as a headless CMS, that's half possible right now. You can fetch individual posts easily enough and grab their full content. However, if you want to fetch a bunch and list them out, you might be out of luck for the time being.
Conclusion
Thank you guys so much for reading. If you enjoyed and found this article helpful, please let me know in the comments. Feel free to reach out to me if you have any questions!
More resources
You use Hashnodes API Playground to view their schema and types and play around with some different kinds of queries and mutations
Let's connect!
Subscribe to my newsletter The Weekly Retrospective, which is about reflecting on the week's experiences and learnings. You can also follow me on Twitter and Instagram. I look forward to hearing from you soon!

